Let the car cool and remove
the bonnet.
Turn the crank (by hand) to
TDC.
Crankshaft @ TDC
Drain the radiator and all the
water from the engine, this is done preferably from the drainage nut in the
radiator(bottom, left-hand side) some water will still reside in the cylinder head.
Note where every tubing,
cable, connector is mounted on the engine. You will need this when putting
it all back.
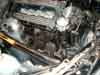
Remove the all intake tubing
from airfilterbox to turbo, from turbo to IC, from IC to throttle body.
Remove IC.
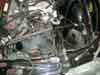
Intake tubing, IC, airfilterbox removed.
Unhook the electrical
"trunk" from the engine.
Electrical trunk
Remove the FPR, fuel rail with
the injectors. BEWARE! there's fuel in the fuel rail. Have rags ready. These
rags must be soaked in water to ensure that fire doesn't break out.
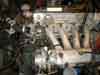
Fuel rail, injectors, FPR, electrical
trunk removed.
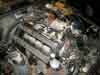
Remove the intake with all
connected tubes.

Intake removed
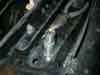
Loose the exhaust pipe from the
turbo. Loose water and oil connectors on the turbo. Remove the turbo from
the exhaust manifold.
Remove the exhaust manifold from the
cylinder head. You might need to cut or unscrew one of the bolts
from the cylinder head to be able to remove the exhaust manifold.
Exhaust manifold removed
Loosen AC compressor, Power steering
pump.
Remove the two bolts from the
rear of the block, going upwards into the cylinder head (12mm wrench).
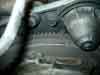
Remove the timing chain tensioner (first use at 13mm wrench to open the small bolt, BEWARE!
spring loaded! Then use a 26mm long socket to remove the tensioner).
Remove the valve cover.
Verify that the Cams are in
TDC
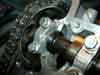
Intake Cam @ TDC
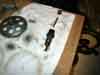
Remove the Cam gears. (14mm
impact socket on cam gear, preferred. Use an adjustable spanner or monkey wrench
on the cam).
Tools of the trade
Remove the two bolts that
holds the head to the right engine mount. (13mm wrench).
Verify that nothing is
attached to the cylinder head.
Jack up the engine/gearbox
"a bit" to loosen the tension of the engine mount on the cylinder head. (use a bit of wooden board and a
hydraulic garage jack on the
inner drive shaft joint on the gearbox) Be careful! And don't let it be under
tension for a long time.
Use a Torx E16 socket to
remove the cylinder head bolts
Torx E16 socket
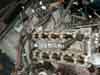
Lift off the Cylinder head. But
watch the timing chain and the lower guide rail for the timing chain. Now will
the rest of the water that resides in the cylinder head pour out. So be ready
with rags.

The headless B202
Remove the old head gasket and
clean the block...
Put on the new head gasket
Put on the B212 cylinder head.
Watch the timing chain and the lower guide rail for the timing chain.
Tighten the two bolts from the
rear of the block, going upwards into the cylinder head (12mm wrench).
Torque the Cylinder head bolts
in the correct order according to specification of gasket and bolt type.

Instructions
Lower the engine and remove
the jack. Tighten the bolts that holds the engine mount to the cylinder head.
Now you got the B212 cylinder
on the B202 engine block. Now you need to make a decision:
- Keep the B212 i16 Intake cam
- Or swap to the B202 T16 Intake cam
The difference is that the B202 T16 cam gives a little more high end power,
but lower pre-turbo torque than the B212 i16 intake cam. It's all up to you,
what kind of engine characteristics you want.
I go for the "Hotter" B202 T16 cam, but I use it in conjunction
with a TE05-12B turbo which has less turbo lag than the TB0357. The TE05-12B
will start pushing air @ aprox 2700 rpm. But the TB0357 will start pushing
air @ aprox 3200 rpm.
If you want to swap then now
it's time to swap the intake cam. The Exhaust cam is the same between B202
and B212.
The crank shall now be in TDC.
Crankshaft @ TDC
Ensure that the timing chain is
in the guide rail. Stretch the timing chain and mount the cam-gear on the exhaust cam. Ensure that the Cam is in TDC. Tighten the bolt a bit. If the
cam-gear is in the wrong state you'll need to do it again.
Mount the cam-gear on the intake cam
in the same way. Ensure that the cam is in TDC.
Mount the timing chain tensioner after you have it reset to initial setting.
Dismantled tensioner
Mount the spring and the 13mm
plug in the timing chain tensioner.
Turn the intake cam
"upwards" to tension the timing chain.
Verify that Crank, ex-cam,
in-cam is in TDC. If not do step 14, 17 and start at step 29 again.
When everything's look good turn the crank (by hand) two full laps. Verify
that Crank, ex-cam, in-cam is in TDC and everything looks good.
Reattach everything with new
gaskets (if needed) in the reverse order , like when you dismantled the cylinder head.
Now I hope you noted where everything was mounted. And which tube went
where. If not, you are now in trouble!
Try to get hold of another SAAB and check the engine.
Refill the engine with water
and antifreeze. Be sure to get all excess air out of the system.
Attach the battery.
Start up! Make sure that oil,
water and all other fluids are in the engine. Cross your fingers and turn
the key.
If the engine starts make sure to keep it between 2000-2500 RPM for the
first 10-15 minutes. This is done to ensure the oil pressure is high enough
to push oil to every part of the engine.
Do a timing calibration of the engine. According to your engine set-up.