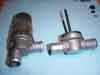
Saab AIC on left- Porsche Idle Control Valve body on right
The Topic:
I, like many Saab owners out there, recently went through the process of correcting an irregular, "hunting" idle on my 900 Turbo. In the process I
learned a few items of interest that may be helpful to others. The focus in this article will be the idle control valve or AIC, in particular the 3
pin type.
If you look at the AIC you will see that it has a Bosch part number. Now,
if you have the chance to look at the AIC on a friends car, a Porsche 944 for instance, you will see that only the last three numbers are different. This
is because the electrical part of these valves are identical. The last three digits are the inlet/outlet configuration. This means that the
electrical (or motor) part of the valve can be swapped between types. Because of this the AIC can be rebuilt.
Saab AIC on left- Porsche Idle Control Valve body on right
The Problem:
The AIC suffers from three typical failure modes. The first is the accumulation of oil and dirt on the vane or shutter portion of the valve.
The clearance between the components is small and the accumulation of deposits causes the valve to respond slowly or not at all.
The second failure deals with wear inside the AIC. The armature has a commutator with three contact surfaces. These surfaces correlate to the
pins on the electrical connector. The AIC is a motor but does not rotate like a typical DC motor. The armature is controlled by the ECU (brain).
The ECU sends current to the motor causing it to oscillate. Because of this the contacts wear the commutator pads and cause pitting. When the damage is
extensive enough the motor can no longer rotate due to mechanical interference. This was the case on my AIC.
The third mode is a failure of the windings on the armature. The windings on the armature are essentially one long wire. If it is broken the AIC stops
working. This is usually found when the resitance across the connector pins is very high or open. This can be cured by replacing the armature with a
donor part.
The Solution:
The first problem can be remedied by cleaning the valve shutter with a solvent. This frees the shutter to move.
The second and third problem can be solved by replacement of the AIC. If you are more adventurous, read on.
The pitting in the commutator pads can be repaired. This means opening the AIC.
The housing is held in place by a series of metal tabs crimped into a groove
on the valve body. These tabs can be bent away to seperate the halves. Mark the halves with a scribe or punch. With the tabs released hold the housing
while pulling the valve body with a SLOW, GENTLE twisting motion. Note that there is an indexing tab on the valve body. Note its orientation to the
electrical connector.
This is VERY IMPORTANT.
When the valve body comes free the entire internal assembly will be extracted from the magnet housing. make sure you do not lose the black
plastic cone that falls out with the valve. If it is inside the housing make sure not to lose it.
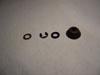
Thrust washers and contact spreaderbushing
If the problem is pitting you will immediately see the damage. The small, round silver surface at the connector end of the shaft will show burn
marks or pitting. If it is a broken or burnt winding it may not be obvious.
Using a small round file, remove the burnt or pitted material from the surface of the pads. The material is copper beneath so do not be alarmed
by the change in color.
Once the burns and pits are cleaned off the surface can be repaired by soldering. Use at least a 40Watt soldering iron. Use a silver bearing
solder, minimum of 4% silver. Heat the pad and "tin" the filed area with solder. Allow the pad to cool and do not overheat. You can melt the
mounting substrate. Rotate the armature and repeat. After all three pads are tinned then continue soldering to build up the area on each pad.
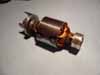
AIC armature that has already had the commutator pads soldered
After soldering the pads allow the commutator to cool. Once it has cooled you will need to resurface the pads. If you have access to a lathe, remove
the circlip holding the armature on the valve shaft. Make note of the washers and shims. Note their order for reassembly. The armature can be
removed and put in a lathe to turn the commutator. After turning the pads smooth polish with 1200 grit or crocus cloth.
If you don't have a lathe simply clamp the valve body in a vise and use a strip or emery cloth (220 grit or higher to start) to burnish the pads.
Sand lightly and use a finer grit to polish the pads.
After polishing us a scribe, pick or backcutting tool to clean the gap between the pads. Wipe the pads clean. If you need to, reassmble the valve
by placing the armature back on the shaft. Remember to put the washers and shims in the correct order.
Examine the contacts in the magnet housing. You should see three small metal tabs, each with a small silver contact on the end. If these are worn away
they can be repaired but it is better to use a magnet housing from another donor valve.
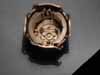
View of contacts inside magnet housing
Now place the black plastic cone on the end of the shaft with the small end
oriented so it will enter the magnet housing first. This is VERY important. The plastic cone pushes the contacts out of the way when reassembling. This
prevents you from destroying the contacts. As you insert the valve assembly be sure that the valve body indexing tab
is in the correct orientation to the electrical plug.
This has to be correct for two reasons;
1 - This aligns the armature to the magnets
2 - If it is wrong you will create a short that will damage the ECU.
Test the resitance across the pins. This test will tell you immediately if the housing is oriented correctly.
Once the AIC is reassembled and checked the tabs can be crimped back into place. Refit the unit to the car and follow the idle setting procedure.
There are a few vairations on this procedure depending on the armature, contact and shutter condition. But this will allow about 80% of failed
AICs to be repaired. If repair isn't possible then your next solution is simply swapping the affected parts from a donor valve. This will allow you to
keep the correct valve body while effectively getting a new valve.
If you are not brave enough to do this but want to have your AIC fixed
contact me: moberle@900aero.com
Good Luck !.